
Key Takeaways
- Brittle, cracked, or discolored insulation on a vintage lamp’s wiring is a fire hazard and should be replaced immediately.
- Most mid-century ceramic lamp rewiring is legal DIY work in the United States and does not require a licensed electrician.
- Cloth-covered twisted lamp cord (18 AWG, SPT-1 or SPT-2) is the period-correct and safest choice for mid-century ceramic lamps.
- The total cost of parts runs $15 to $40; professional rewiring typically costs $50 to $100 per lamp at a lamp repair shop.
- Always unplug the lamp and confirm zero voltage with a non-contact tester before touching any wiring.
- Ceramic lamp bodies are fragile, so internal routing of the cord requires patience and a lamp cord threader or stiff wire guide.
- The most common rewiring mistake is reversing the neutral and hot wires at the socket, which creates a shock risk even when the lamp is switched off.
- Replacement parts (sockets, harps, cord sets, plugs) are widely available from specialty lamp parts retailers and online marketplaces.
- A properly rewired vintage ceramic lamp can safely last another 50 years with quality parts.
Are Mid-Century Ceramic Lamps Dangerous If the Wiring Is Old?
Yes, old wiring on mid-century lamps is a genuine electrical hazard. Lamps manufactured before the 1970s often used rubber-insulated or early plastic-insulated wire that dries out, cracks, and becomes brittle with age. When insulation fails, bare copper conductors can arc against the ceramic body or touch each other, causing shocks or fires.
The specific risks include:
- Insulation breakdown: Rubber insulation from the 1950s and 1960s degrades into a powder-like state after decades of heat cycling from the bulb.
- Undersized cord: Many vintage lamps used 20 AWG or lighter wire, which runs hotter than modern 18 AWG cord under the same load.
- Ungrounded plugs: Pre-1960s lamps typically have two-prong plugs with no ground, which is acceptable for double-insulated fixtures but must be wired correctly.
- Corroded sockets: The brass contacts inside old sockets oxidize and create resistance, generating heat at the connection point.
Decision rule: If the cord is stiff, the insulation cracks when you bend it, or the plug is warm to the touch after use, replace the wiring before using the lamp again.
How Do I Know If My Lamp’s Wiring Needs to Be Replaced?
You can assess wiring condition in about five minutes with a visual inspection and a simple continuity test. A lamp does not need to be sparking or dead to need rewiring; subtle signs are often the real warning.
Signs that wiring needs immediate replacement:
- Cord insulation is cracked, stiff, or flaking
- Visible bare copper wire anywhere along the cord
- Scorch marks or a burning smell near the socket
- The lamp flickers when the cord is moved or bent
- The plug or socket feels warm after 30 minutes of use
- The cord’s outer jacket is discolored brown or yellow (heat damage)
Quick continuity test: Plug the lamp into a known working outlet. If it does not light and bulb replacement does not fix it, use a non-contact voltage tester at the socket to confirm power is reaching the fixture. No power at the socket with power at the outlet means a broken wire inside the cord.
A lamp that passes visual inspection but is more than 40 years old is still worth rewiring as preventive maintenance, especially if it will be used daily.
What Tools Do I Need to Rewire a Vintage Ceramic Lamp?
You need about eight basic tools, most of which you likely already own. No specialty electrical tools are required for a standard ceramic lamp rewiring.
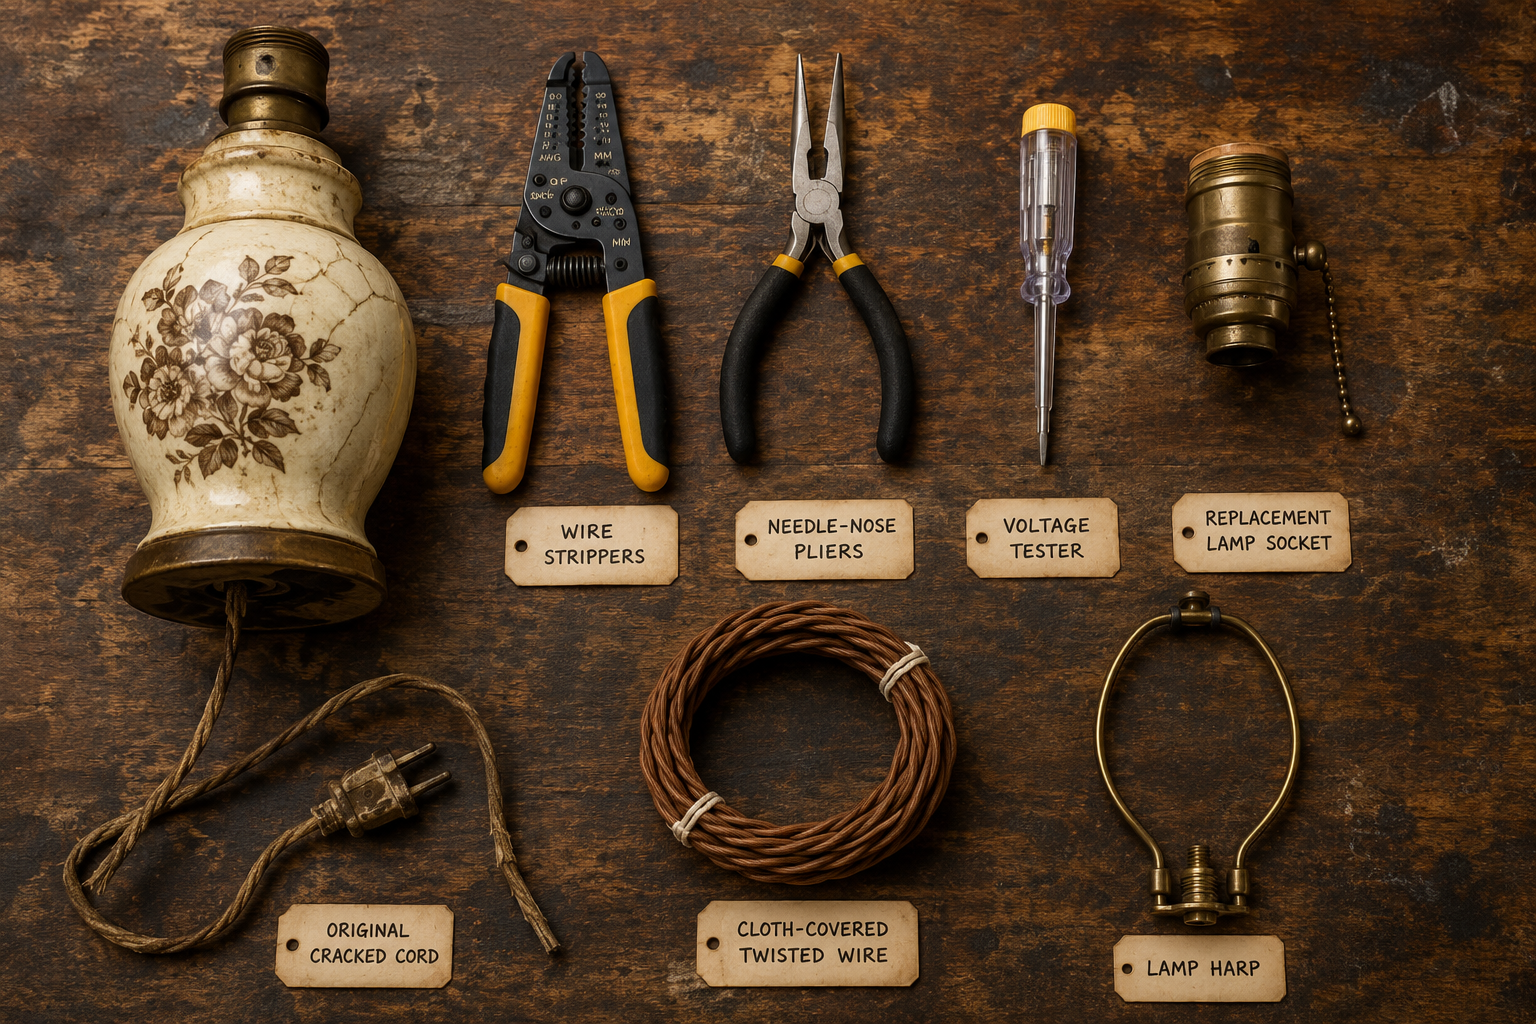
Required tools:
- Wire strippers (18-22 AWG range)
- Needle-nose pliers
- Flathead and Phillips screwdrivers
- Non-contact voltage tester (confirms the lamp is unplugged and dead)
- Utility knife
- Lamp cord threader or a stiff piece of wire (coat hanger works)
- Electrical tape
- Multimeter (optional but helpful for checking continuity after assembly)
Required replacement parts:
| Part | Typical Cost | Notes |
|---|---|---|
| Cloth-covered lamp cord (6 ft) | $8 to $15 | 18 AWG, SPT-1 or SPT-2 |
| Replacement lamp socket | $5 to $12 | Match the original shell size (medium base is standard) |
| Polarized plug | $3 to $6 | Wide blade = neutral |
| Strain relief bushing | $1 to $2 | Protects cord at lamp base entry |
| Lamp harp and saddle (if missing) | $5 to $10 | Optional, only if needed |
Total parts cost: $15 to $40, depending on cord length and socket quality.
What Kind of Wiring Is Best for Mid-Century Modern Ceramic Lamps?
Cloth-covered twisted lamp cord is the correct choice for mid-century modern ceramic lamps, both for safety and period authenticity. Specifically, 18 AWG SPT-1 or SPT-2 twisted cord with a cotton or rayon braid outer jacket is the industry standard recommendation for vintage lamp restoration.
Why cloth-covered cord?
- It matches the original aesthetic of 1950s and 1960s lamps
- The twisted construction (rather than parallel) reduces electromagnetic interference and looks period-correct
- It is rated for the same voltage and amperage as modern parallel cord
- Available in dozens of colors to complement ceramic glazes (gold, ivory, black, brown, and olive are popular for mid-century palettes)
Avoid: Standard parallel zip cord (the white or brown plastic cord sold at hardware stores) is safe but looks wrong on a vintage ceramic lamp and can detract significantly from resale value.
Wire gauge: 18 AWG handles up to 300 watts on a standard 120V circuit, which is more than sufficient for any incandescent, LED, or CFL bulb used in a table lamp.
Can I Rewire a Lamp Myself or Do I Need an Electrician?
In the United States, rewiring a portable lamp (a plug-in table or floor lamp) is legal DIY work in all 50 states and does not require a licensed electrician. Lamp rewiring is classified as appliance repair, not fixed electrical wiring, so no permit is needed.
When to call a professional instead:
- The lamp is hardwired into the wall (not plug-in)
- You are uncomfortable working with electrical components
- The lamp has unusual internal wiring, multiple sockets, or a built-in dimmer
- You are in a country where residential electrical work requires licensing (for example, the United Kingdom requires Part P compliance for fixed installations, though portable appliance repair is generally exempt)
What electrical certification do you need? For plug-in lamp rewiring in the United States, none. For hardwired fixtures, a licensed electrician is required in most jurisdictions. In the UK, rewiring a portable lamp yourself is legal, but having it PAT tested afterward is good practice if it will be used commercially.
How Much Does It Cost to Professionally Rewire an Old Lamp?
Professional lamp rewiring at a lamp repair shop or antique lamp specialist typically costs $50 to $100 per lamp, including parts and labor. High-end shops in major cities may charge $75 to $150 for complex fixtures.
Cost breakdown:
- Labor: $35 to $75 per lamp (30 to 60 minutes of shop time)
- Parts: $15 to $40 (cord, socket, plug)
- Turnaround: Usually 3 to 10 business days; same-day service is sometimes available for an upcharge
Is professional rewiring worth it? For a lamp valued at $500 or more, yes. A professional will also inspect the socket shell, check the harp saddle, and often clean the ceramic body. For a $40 thrift store find, DIY rewiring makes more financial sense.
Step-by-Step: The Complete Guide to Rewiring Mid-Century Modern Ceramic Lamps Safely
This process covers a standard single-socket ceramic table lamp. Work on a clean, well-lit surface and keep the lamp unplugged throughout.
Step 1: Disassemble the lamp Remove the shade, harp, and bulb. Unscrew the harp saddle if present. Look at the base of the lamp for a felt pad; peel it back to find the cord entry point.
Step 2: Remove the socket Press the socket shell at the point where it says “PRESS” and lift the shell off the socket cap. Unscrew the two terminal screws and disconnect the old wires. Note which wire (ribbed = neutral, smooth = hot) connects to which screw (silver = neutral, brass = hot).
Step 3: Pull the old cord Tie the new cord to the old cord at the base before pulling, so the new cord threads itself through the lamp body as you pull the old cord out from the top. If the old cord breaks during removal, use a lamp cord threader or stiff wire to guide the new cord through the ceramic body.
Step 4: Prepare the new cord Split the last 3 inches of cord into two conductors. Strip 3/4 inch of insulation from each wire end. Twist the copper strands clockwise and form a small clockwise loop at each end (this helps the wire wrap cleanly around the terminal screw).
Step 5: Connect the socket
- Ribbed (neutral) wire connects to the silver screw
- Smooth (hot) wire connects to the brass screw
- Tighten screws firmly; no bare copper should be visible outside the screw connection
Step 6: Reassemble and test Snap the socket shell back onto the cap. Attach the plug at the base (wide blade to ribbed/neutral wire). Install a bulb and plug in the lamp. Use a non-contact tester to confirm the socket is live, then test the switch.
Step 7: Finish the base Install a strain relief bushing at the cord entry point. Re-glue the felt pad. Dress the cord neatly.
What Are the Most Common Mistakes When Rewiring Vintage Lamps?
The single most common mistake is reversing the hot and neutral wires at the socket. This leaves the lamp shell energized even when switched off, creating a shock hazard when changing bulbs.
Other frequent errors:
- Not using a strain relief: Without a bushing at the base entry, the cord rubs against the ceramic edge and the insulation wears through over time.
- Over-stripping wire: Stripping more than 3/4 inch leaves bare copper that can short against the socket shell.
- Using the wrong cord gauge: 20 AWG or lighter cord runs hot under normal use; always use 18 AWG minimum.
- Skipping the continuity test: Assemble the lamp fully, then use a multimeter to confirm continuity from plug to socket before plugging it in.
- Forcing the cord through the ceramic body: Ceramic is brittle. Use a threader and gentle pressure; forcing a stiff cord can crack the lamp body from the inside.
Which Types of Mid-Century Ceramic Lamps Are Hardest to Rewire?
Lamps with narrow or curved internal channels are the most difficult to rewire. Some specific types require extra patience or professional help.
Most challenging configurations:
- Stacked ceramic disc lamps: Multiple ceramic pieces threaded onto a central rod; the cord must pass through each disc, and alignment is critical.
- Figural lamps (animals, abstract sculptures): Narrow, irregular internal channels that a standard cord threader may not navigate.
- Ceramic lamps with built-in bases: No removable felt pad at the bottom means the old cord cannot be easily pulled through; the lamp may need to be drilled or the base carefully separated.
- Double-socket torchiere-style ceramics: Require two separate cord runs or a properly rated parallel wiring harness inside the body.
Easier configurations: Simple cylindrical or bottle-shaped ceramic bases with a straight vertical channel are the most straightforward to rewire and are ideal for a first project.
Where Can I Buy Replacement Lamp Parts for Vintage Ceramics?
Quality replacement parts for mid-century lamp restoration are available from several reliable sources in 2026.
Specialty lamp parts retailers:
- Sundial Wire (sundialwire.com): Extensive selection of cloth-covered twisted cord, period-correct plugs, and sockets
- Grand Brass Lamp Parts (grandbrass.com): Professional-grade sockets, harps, and hardware
- B&P Lamp Supply (bplampsupply.com): One of the largest wholesale and retail lamp parts suppliers in the US
General marketplaces:
- Amazon and eBay carry most standard parts (sockets, cord sets, plugs) at competitive prices, though quality varies by seller
- Local hardware stores (Home Depot, Ace Hardware) carry basic lamp repair kits, though cloth-covered cord is rarely stocked in stores
For period-correct hardware: Etsy sellers specializing in vintage lamp restoration often carry reproduction brass sockets, milk glass shades, and other hard-to-find mid-century components.
Safety Precautions Specific to Rewiring Old Ceramic Lamps
Ceramic lamp bodies present specific safety considerations beyond standard lamp rewiring. The material is non-conductive, which is an advantage, but it is also fragile and can hide internal damage.
Key safety rules for ceramic lamps:
- Always confirm zero voltage with a non-contact tester before touching any wiring, even after unplugging (capacitors in some dimmer-equipped lamps can hold a charge briefly)
- Inspect the interior of the ceramic body with a flashlight before threading new cord; look for ceramic chips or sharp edges that could cut the new cord’s insulation
- Do not use a cord with a larger diameter than the original; forcing an oversized cord through a ceramic channel can crack the body
- If the ceramic shows any cracks near the cord entry point, reinforce with epoxy before rewiring to prevent the crack from spreading during use
- Never use a bulb wattage higher than the socket’s rating, which is stamped on the socket shell (typically 60W or 150W for vintage medium-base sockets)
How Long Does a Typical Lamp Rewiring Project Take?
For a straightforward single-socket ceramic table lamp, plan on one to two hours for a first-time DIYer. An experienced person familiar with the process can complete the same job in 30 to 45 minutes.
Time breakdown:
| Task | Estimated Time |
|---|---|
| Disassembly and inspection | 10 to 15 minutes |
| Removing old cord | 10 to 20 minutes |
| Threading new cord | 10 to 30 minutes (varies by lamp shape) |
| Wiring socket and plug | 15 to 20 minutes |
| Reassembly and testing | 10 to 15 minutes |
The cord threading step is where most of the time variability lives. A lamp with a straight, open channel takes five minutes. A stacked disc lamp or figural ceramic can take 30 minutes or more.
Frequently Asked Questions
Can I use LED bulbs in a rewired mid-century ceramic lamp? Yes. LED bulbs are compatible with standard medium-base sockets and run cooler than incandescent bulbs, which actually extends the life of the new wiring. Choose a bulb rated at or below the socket’s maximum wattage.
Is it safe to use a two-prong plug on a rewired ceramic lamp? Yes, for a ceramic lamp with a single socket and no metal exterior parts. Ceramic is non-conductive, so a grounded three-prong plug is not required. However, if the lamp has a metal harp, metal socket shell, or any exposed metal hardware, a grounded plug and cord are safer.
What does the ribbed side of the lamp cord mean? The ribbed (textured) conductor is the neutral wire. It connects to the wide blade of the plug and the silver screw on the socket. The smooth conductor is the hot wire. Getting this right is critical for safe operation.
How do I thread a new cord through a ceramic lamp with no access hole at the base? Carefully remove the felt pad and look for a recessed nut or set screw holding the lamp rod. Loosen it, and the rod (with the old cord attached) can often be pulled out from the top, taking the old cord with it. Thread the new cord through the rod before reinserting it.
Can I add a dimmer switch to a rewired mid-century ceramic lamp? Yes, but use an in-line cord dimmer rated for the bulb type you are using. LED-compatible dimmers are required for LED bulbs. Standard incandescent dimmers will cause LED bulbs to flicker or buzz.
What is the lifespan of new lamp cord? Quality 18 AWG cloth-covered lamp cord has a rated lifespan of 20 to 30 years under normal residential use, assuming the bulb wattage stays within the socket rating and the lamp is not left on continuously.
Do I need to replace the socket if the wiring is the only problem? Not necessarily. If the socket shell is clean, the contacts are bright brass with no pitting, and the switch clicks firmly, the socket can be reused. If the contacts are dark, pitted, or the switch feels loose, replace the socket for about $8.
What happens if I wire the lamp backward (hot and neutral reversed)? The lamp will still light, but the socket shell will be energized. Anyone touching the metal socket while changing a bulb could receive a shock. Always wire neutral to silver and hot to brass.
Is there a way to test the lamp before fully reassembling it? Yes. With the socket wired but the shell not yet snapped on, plug the lamp in briefly and use a non-contact tester to confirm the hot wire is at the brass screw. Then unplug before snapping the shell into place.
Where can I find a lamp repair shop near me? Search for “lamp repair” or “lamp rewiring” on Google Maps. Antique dealers and lighting showrooms often know local specialists. Sundial Wire and Grand Brass Lamp Parts also maintain referral lists of lamp repair professionals.
Conclusion
Rewiring a mid-century modern ceramic lamp is one of the most satisfying small restoration projects you can take on. The stakes are real (old wiring is a genuine fire hazard), the skills are accessible, and the result is a piece that can safely light a room for another generation.
Actionable next steps:
- Inspect every vintage lamp in your home today. Bend the cord near the plug and look for cracking. Check the plug for warmth after use.
- Order parts before you start. Having cloth-covered cord, a replacement socket, and a polarized plug on hand means you can complete the job in a single session.
- Start with the simplest lamp in your collection (straight cylindrical body, single socket) to build confidence before tackling a stacked disc or figural piece.
- Document the original wiring with a photo before disconnecting anything. It takes 10 seconds and eliminates guesswork during reassembly.
- If a lamp has sentimental or significant monetary value, get a professional estimate before attempting DIY. The cost difference is modest, and peace of mind has real value.
A rewired lamp is a safer lamp. It is also a lamp that will outlast the next generation of owners, which is exactly what good mid-century design was built to do.
References
- Sundial Wire. (n.d.). Lamp cord and rewiring resources. Retrieved from https://www.sundialwire.com
- Grand Brass Lamp Parts. (n.d.). Lamp parts catalog and wiring guides. Retrieved from https://www.grandbrass.com
- B&P Lamp Supply. (n.d.). Lamp repair parts and technical guides. Retrieved from https://www.bplampsupply.com
- National Fire Protection Association. (2021). NFPA 70: National Electrical Code. NFPA.
- U.S. Consumer Product Safety Commission. (2020). Home electrical safety checklist. CPSC. Retrieved from https://www.cpsc.gov
Read next: The Best Low-Light Aquatic Plants for Low-Tech Shrimp Tanks. A closer look at low-light aquarium plants.