
Key Takeaways
- You need fewer than ten tools to bake excellent sourdough bread consistently
- A Dutch oven is the single most important piece of equipment, but workable alternatives exist
- A digital kitchen scale accurate to 1 gram is non-negotiable for reliable results
- Budget-friendly setups starting around $80 to $100 can produce bakery-quality loaves
- Counter space of roughly 2 square feet is enough for active baking sessions
- Fermentation temperature between 75°F and 80°F (24°C to 27°C) produces the most predictable results
- Expensive proofing baskets offer real benefits, but a simple bowl lined with a floured towel works fine for beginners
- Regular all-purpose or bread flour from a grocery store is perfectly adequate for home sourdough baking
- The biggest beginner mistakes involve equipment overload, not equipment shortage
What Basic Equipment Do You Really Need to Start Baking Sourdough
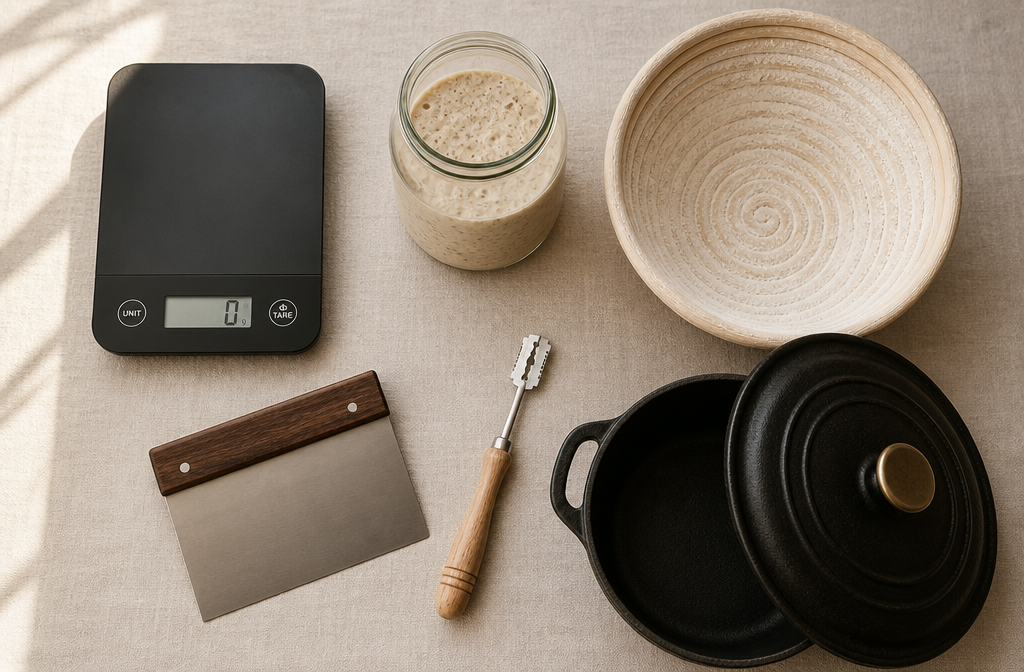
You need five core items to bake sourdough bread at home: a digital kitchen scale, a Dutch oven or equivalent covered baking vessel, a proofing basket or substitute, a bench scraper, and a lame or sharp razor blade for scoring. That’s it. A large mixing bowl and a kitchen thermometer round out a complete, lean setup.
Here is the full starter list for a minimalist kitchen setup for passionate sourdough bakers:
| Tool | Purpose | Budget Option |
|---|---|---|
| Digital kitchen scale | Precise measurements | $12 to $25 |
| Dutch oven (4 to 6 qt) | Steam trapping for crust | $30 to $80 |
| Banneton / proofing basket | Shaping and final proof | $15 to $30 |
| Bench scraper | Dough handling | $8 to $12 |
| Lame or razor blade | Scoring the loaf | $5 to $15 |
| Instant-read thermometer | Dough and oven temp | $10 to $20 |
| Large mixing bowl (4 qt) | Bulk fermentation | $8 to $15 |
Total estimated cost: $88 to $197
You do not need a stand mixer, a bread proofer, a banneton liner set, a specialty flour sifter, or a steam injection oven. These items add cost and counter clutter without meaningfully improving a home baker’s results.
How Much Does a Starter Minimalist Sourdough Kitchen Cost
A functional minimalist sourdough kitchen costs between $80 and $250 depending on whether you already own a Dutch oven and mixing bowls. Most beginners can get started for under $120 by choosing mid-range versions of each essential tool.
Cost breakdown by tier:
- Bare minimum (under $100): A $20 digital scale, a $35 Lodge cast iron Dutch oven, a $10 bench scraper, a $5 razor blade, and a $10 proofing basket from a restaurant supply store. Total: roughly $80.
- Mid-range setup ($100 to $200): Add an instant-read thermometer, a quality banneton with liner, and a dedicated lame tool. Total: around $150.
- Upgraded minimalist ($200 to $250): A higher-precision scale (such as an Escali Primo or OXO Good Grips), an enameled cast iron Dutch oven, and a second proofing basket for two-loaf batches.
The sourdough starter itself costs nothing if you make it from flour and water, or under $10 if you purchase a dried culture online.
Common mistake: New bakers often spend $300 or more on specialty items before baking a single loaf. Start with the bare minimum and upgrade only after you identify a genuine gap in your process.
Can You Make Sourdough Bread Without a Dutch Oven
Yes, you can bake excellent sourdough without a Dutch oven. The Dutch oven’s main function is to trap steam during the first 20 minutes of baking, which keeps the crust soft long enough for the loaf to expand fully. Any covered, oven-safe vessel achieves the same result.
Practical Dutch oven alternatives:
- A large stainless steel pot with a lid (oven-safe to 450°F / 230°C)
- A covered casserole dish or roaster pan
- A cloche (a ceramic domed baking cover)
- Two stacked cast iron skillets (one inverted over the other)
- A baking stone or steel paired with a metal bowl placed over the loaf to trap steam
Choose a Dutch oven if you bake more than twice a week or want consistent, bakery-style oven spring. Choose an alternative if you already own a suitable covered pot and want to avoid buying new equipment.
One note on safety: avoid glass lids at temperatures above 400°F. Tempered glass can crack under high oven heat.
What’s the Difference Between Home and Professional Sourdough Setups
The core difference is scale and environmental control, not technique. Professional bakeries use deck ovens with steam injection, commercial mixers, walk-in proofing chambers with humidity control, and large-batch fermentation tanks. Home bakers achieve comparable quality through smaller-scale versions of the same principles.
Key differences at a glance:
| Factor | Home Setup | Professional Setup |
|---|---|---|
| Oven | Conventional home oven | Deck oven with steam injection |
| Mixing | By hand or stand mixer | 20 to 80 qt spiral mixer |
| Proofing control | Room temperature or cooler | Controlled proofing chamber |
| Batch size | 1 to 4 loaves | 20 to 200+ loaves |
| Flour sourcing | Grocery store or local mill | Bulk commercial or specialty mill |
| Cost | $80 to $500 | $10,000 to $100,000+ |
The minimalist kitchen setup for passionate sourdough bakers at home actually mirrors professional priorities: precise measurement, consistent fermentation temperature, and proper steam during baking. The tools are smaller and cheaper, but the principles are identical.
Are Expensive Bread Proofing Baskets Actually Worth It
For most home bakers, a $15 to $25 banneton from a reputable supplier is worth the cost. The real question is whether a $60 to $100 artisan basket from a specialty brand offers meaningful improvement over a mid-range option. In most cases, it does not.
What a proofing basket actually does:
- Holds the shaped dough in a round or oval form during the final proof
- Wicks away surface moisture, creating a slightly drier skin that scores cleanly
- Imprints a spiral pattern on the loaf (purely aesthetic)
A floured linen-lined bowl or a colander lined with a well-floured kitchen towel performs the same structural function. The difference in crust texture between a $15 rattan banneton and a $75 handmade one is negligible for home baking.
Worth buying if: You bake at least once a week and want a dedicated tool that doesn’t require re-flouring a towel every time. Not worth the premium if: You’re still learning fermentation timing and shaping technique. Master the process first.
What Kitchen Tools Do Professional Sourdough Bakers Recommend
Professional sourdough bakers consistently recommend four tools above all others: a reliable digital scale, a high-quality bench scraper, a sharp lame, and a cast iron Dutch oven. These four items appear on virtually every professional baker’s short list.
Beyond the core four, experienced bakers often add:
- An instant-read thermometer (for checking dough temperature at 75°F to 78°F and oven temperature accuracy)
- A proofing basket with a linen liner
- A large, wide mixing bowl with a flat bottom for easy stretch-and-fold technique
- A kitchen timer or dedicated baking app for tracking fermentation stages
- A spray bottle for adding surface moisture when not using a Dutch oven
Bakers who have been working with sourdough for years tend to own fewer tools, not more. The minimalist kitchen setup for passionate sourdough bakers aligns closely with what working professionals actually use daily.
Common Mistakes Beginner Sourdough Bakers Make With Their Kitchen Setup
The most common mistake is buying too much equipment before developing the skills to use it. A $200 proofing box won’t fix under-fermented dough, and a $150 baking steel won’t compensate for poor shaping technique.
The seven most common setup mistakes:
- Skipping a digital scale and measuring by volume instead (sourdough hydration percentages require gram-level accuracy)
- Using a too-small Dutch oven (under 4 quarts) that restricts oven spring
- Not owning a thermometer and guessing dough and fermentation temperatures
- Buying a stand mixer immediately before learning hand-mixing techniques that build dough feel
- Using a thin, dark baking pan instead of a heavy vessel, resulting in a burned bottom crust
- Storing the starter in a metal container (reactive metals can affect starter health over time; use glass or food-grade plastic)
- Overcrowding the counter with gadgets that interrupt the workflow during an active bake
Fix these before spending more money. Most failed loaves trace back to process errors, not equipment gaps.
Best Budget-Friendly Alternatives to Fancy Sourdough Equipment
Budget-conscious bakers can replicate the function of nearly every specialty sourdough tool with common household items or inexpensive substitutes. You don’t need to spend more than $100 to bake excellent bread.
Direct substitutions:
- Banneton: A medium mixing bowl lined with a well-floured linen or cotton kitchen towel
- Lame: A new single-edge razor blade held at an angle, or a very sharp serrated knife
- Bench scraper: A stiff plastic spatula or a clean plastic card (though a $9 metal scraper is worth buying)
- Dutch oven: A covered stainless steel pot or a cast iron skillet with a stainless bowl inverted over it
- Proofing box: A turned-off oven with just the light on (creates roughly 75°F to 80°F ambient temperature)
- Rice flour for dusting: Regular all-purpose flour works, though it absorbs faster and may stick more
The one item I would not substitute is the digital scale. Analog scales and volume measurements introduce too much variability for reliable sourdough hydration control.
Is Sourdough Baking Practical for Small Apartment Kitchens
Yes, sourdough baking is well-suited to small apartment kitchens. The active work time during a bake requires only about 2 square feet of clear counter space, and the tools store compactly in a single cabinet or drawer.
Space-saving strategies for apartment bakers:
- Store the Dutch oven in the oven itself when not baking
- Keep the proofing basket nested inside the mixing bowl
- Use a wall-mounted magnetic strip for the bench scraper and lame
- Proof the dough in the refrigerator overnight (cold retard method), which eliminates the need for a dedicated proofing space and actually improves flavor
The cold retard method is particularly practical for apartment bakers because it decouples the timing from room temperature fluctuations. Shape the dough in the evening, refrigerate it overnight, and bake it straight from the fridge the next morning.
One honest note: Sourdough baking does require you to be home for 4 to 6 hours during bulk fermentation. That’s a time constraint, not a space constraint.
How Do I Know If I Have the Right Counter Space and Scale for Serious Sourdough
Two square feet of clear counter space is sufficient for active sourdough work. You need room for a mixing bowl, a scale, and space to perform stretch-and-fold maneuvers. A kitchen scale accurate to 1 gram is the minimum standard for serious baking.
For the scale specifically:
The most accurate and widely recommended scales for home sourdough bakers in 2026 fall into two categories:
- Budget-accurate ($12 to $25): Etekcity EK6015 or similar 0.1g-resolution scales. Accurate enough for starter measurements and dough hydration.
- Mid-range ($25 to $50): OXO Good Grips 11-pound scale or Escali Primo. Better tare function, more durable platform, and easier to clean.
Avoid scales that only measure in 5-gram increments. Starter feeding ratios and small-batch adjustments require 1-gram precision.
Counter space rule of thumb: If you can set out a large mixing bowl and still have 6 inches of clear space on each side, you have enough room for an active bake.
Do I Need Special Flour or Can I Use Regular Grocery Store Brands
Regular grocery store bread flour or all-purpose flour works well for sourdough. You do not need specialty flour to bake excellent sourdough at home. King Arthur Bread Flour, Bob’s Red Mill Artisan Bread Flour, and standard supermarket bread flour brands all produce consistent, high-quality loaves.
Flour basics for sourdough:
- Bread flour (11.5% to 13% protein): Best for high-hydration doughs and strong gluten development
- All-purpose flour (10% to 11.5% protein): Works well for beginner recipes and lower-hydration loaves
- Whole wheat flour: Add 10% to 20% to your blend for deeper flavor and faster fermentation
- Rye flour: Even a 5% addition significantly boosts starter activity and adds complexity
Specialty stone-milled flours from local mills offer flavor advantages, but they are not necessary for a minimalist kitchen setup for passionate sourdough bakers. Master the process with grocery store flour first, then experiment with specialty varieties.
What Temperature and Humidity Conditions Work Best for Sourdough Fermentation
The ideal bulk fermentation temperature for sourdough is between 75°F and 80°F (24°C to 27°C). At this range, a well-maintained starter will drive a full bulk fermentation in 4 to 6 hours. Lower temperatures slow fermentation; higher temperatures accelerate it and risk over-fermentation.
Temperature effects on fermentation timing (approximate):
| Dough Temperature | Bulk Fermentation Time |
|---|---|
| 65°F (18°C) | 8 to 12 hours |
| 70°F (21°C) | 6 to 8 hours |
| 75°F (24°C) | 4 to 6 hours |
| 80°F (27°C) | 3 to 4 hours |
| 85°F (29°C) | 2 to 3 hours (risk of over-proofing) |
Humidity: High ambient humidity (above 70%) can cause the dough surface to stay too wet during shaping, making it sticky and hard to handle. Low humidity (below 40%) can dry out the dough surface during bulk fermentation, forming a skin that restricts rise. A light cover of plastic wrap or a damp towel over the bowl solves both problems.
For apartment bakers without climate control, the cold retard method in the refrigerator (34°F to 40°F / 1°C to 4°C) offers the most consistent results regardless of season.
FAQ
Q: Can I start sourdough baking with just a mixing bowl and a regular oven? Yes, but you’ll need at least a digital scale and a covered baking vessel to get reliable results. A mixing bowl alone is not enough.
Q: How long does a sourdough starter take to become active enough to bake with? Most starters become reliably active in 5 to 14 days of daily feedings at room temperature. Warmer environments (above 75°F) tend to speed this up.
Q: Is a cast iron Dutch oven better than an enameled one for sourdough? Both work equally well for baking. Enameled cast iron is easier to clean and won’t react with acidic dough. Bare cast iron is cheaper and more durable long-term.
Q: How often do I need to clean my banneton? Scrape out dried flour after each use and let it air dry completely. Deep cleaning every 10 to 15 uses with a stiff brush and warm water is sufficient. Never soak it or put it in a dishwasher.
Q: Can I use a bread machine for sourdough? A bread machine can mix and proof sourdough, but most machines don’t reach the 450°F to 500°F temperatures needed for proper crust development. Baking in a conventional oven with a Dutch oven produces far better results.
Q: What’s the minimum oven temperature needed for sourdough? Preheat to at least 450°F (230°C) with the Dutch oven inside. Lower temperatures produce a pale, soft crust rather than the dark, crackling crust characteristic of good sourdough.
Q: How do I keep my starter alive if I only bake once a week? Store it in the refrigerator and feed it once a week. Take it out the night before baking, feed it, and let it reach peak activity (doubled in size, domed top) before using it.
Q: Does the brand of flour matter for sourdough starter health? Not significantly. Unbleached all-purpose or bread flour from any major brand works well. Whole wheat or rye flour added at 10% to 20% can boost starter activity due to higher wild yeast content.
Q: Is sourdough baking expensive to maintain long-term? No. Once you own the basic tools, the ongoing cost is just flour, water, and salt. A standard 900-gram loaf costs roughly $0.50 to $1.50 in ingredients depending on flour brand.
Q: Can I bake sourdough in a convection oven? Yes. Reduce the temperature by 25°F (about 15°C) from the recipe’s stated temperature, and keep the Dutch oven covered for the first 20 minutes as usual.
Conclusion
Building a minimalist kitchen setup for passionate sourdough bakers is less about buying the right gear and more about understanding which tools actually affect the outcome. A digital scale, a Dutch oven, a proofing basket, a bench scraper, and a sharp blade cover 95% of what you need. Everything else is secondary.
Actionable next steps:
- Audit your current kitchen. You likely already own a mixing bowl, a thermometer, and a covered pot that can substitute for a Dutch oven.
- Buy a digital scale if you don’t own one. This is the single highest-impact purchase for any sourdough baker.
- Start your sourdough starter this week using equal parts flour and water by weight. Feed it daily at room temperature until it doubles reliably.
- Bake your first loaf with what you have. Identify the specific gap in your process before spending money on additional tools.
- Once you’ve baked five or six loaves, you’ll know exactly which upgrade matters most for your workflow and kitchen.
The best sourdough kitchen is the one you actually use. A clean counter, five good tools, and consistent practice will take you further than any catalog of specialty equipment.
References
- Robertson, C. (2010). Tartine Bread. Chronicle Books.
- Hamelman, J. (2004). Bread: A Baker’s Book of Techniques and Recipes. Wiley.
- King Arthur Baking Company. (2021). The King Arthur Baking School: Lessons and Recipes for Every Baker. Countryman Press.
- Forkish, K. (2012). Flour Water Salt Yeast: The Fundamentals of Artisan Bread and Pizza. Ten Speed Press.
Read next: Keeping a Travel Journal Without Knowing How to Draw: Creative Alternatives. A closer look at travel journaling without drawing.