
Key Takeaways
- Seed paper is made from recycled paper pulp embedded with plant seeds, and it fully biodegrades when planted in soil
- The basic supplies cost roughly two to four dollars per batch if you already own a blender and a picture frame
- Small, flat seeds work best: wildflowers, basil, thyme, chamomile, and forget-me-nots are reliable choices
- Common beginner mistakes include using too much water in the pulp, adding seeds too early (killing them with heat), and making the paper too thick
- Seed paper is genuinely biodegradable, but only if it contains no synthetic dyes, bleached paper, or plastic coatings
- Kids aged six and older can safely help with most steps, especially seed mixing and pressing
- After planting, most seed paper sprouts within seven to twenty-one days, depending on the seed variety and season
- If seed paper fails to sprout, the most common causes are planting too deep, insufficient moisture, or using old seeds
What Exactly Is Seed Paper and How Does It Work
Seed paper is recycled paper pulp that has been embedded with live seeds before drying. When the finished paper is planted in moist soil, the paper fibers break down within days, releasing the seeds directly into the growing medium.
The concept has been around since at least the 1990s in artisan craft circles, but it gained mainstream attention as zero-waste gifting became a cultural priority. The mechanics are straightforward: paper is mostly cellulose fiber, which soil microbes decompose quickly. Seeds embedded in the pulp stay dormant as long as the paper is dry. The moment moisture and warmth reach them in soil, germination begins.
For gift tags specifically, seed paper serves a double purpose. The recipient gets a functional tag during the gift-giving moment, and then a living plant afterward. Nothing goes in the bin.
What Materials Do I Need to Make Seed Paper at Home
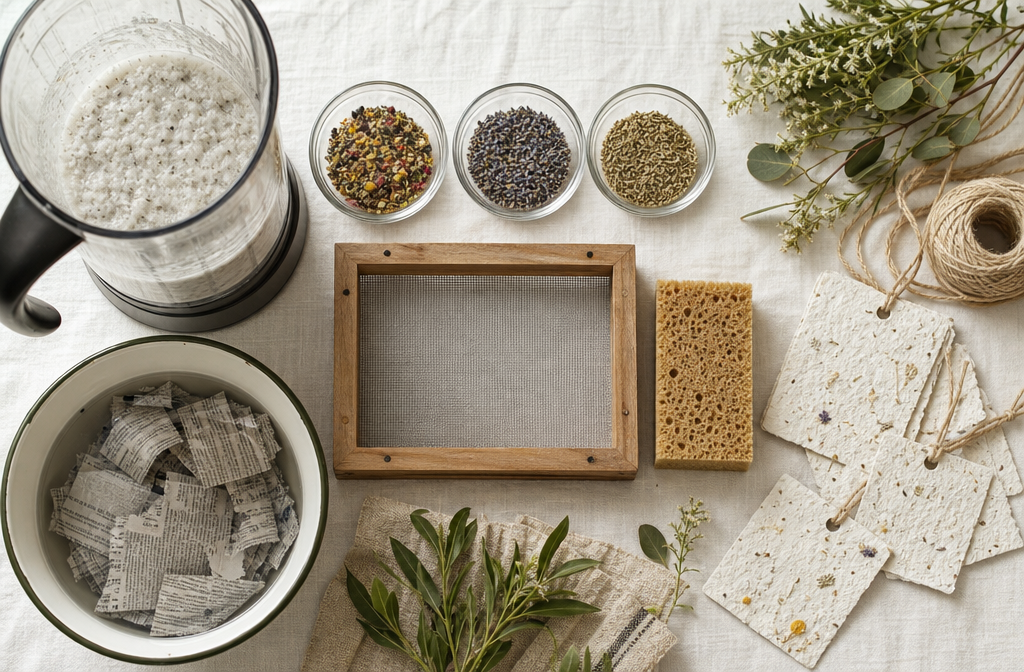
You need six basic items, most of which you probably already own. No specialty equipment is required.
Core supplies:
- Recycled paper scraps (newspaper, junk mail, egg cartons, or office paper torn into small pieces)
- A blender or food processor
- A picture frame with window screen or fine mesh stapled across it (this is your mold)
- A sponge or clean cloth for pressing
- A flat surface covered with a towel or felt sheet for drying
- Seeds of your choice
Optional but helpful:
- A second flat piece of mesh or screen to press on top of the wet pulp
- A rolling pin for even pressing
- Cookie cutters or a craft punch for shaping tags
- A hole punch and natural twine for finishing
You do not need a papermaking kit from a craft store. A five-dollar picture frame from a thrift shop with window screen stapled across the back works just as well as commercial molds.
How Much Does It Cost to Make Seed Paper Compared to Buying It
Making seed paper at home costs roughly one to four dollars per batch of fifteen to twenty tags, compared to commercial seed paper gift tags that typically retail between one and three dollars each. The savings are significant if you’re making tags in volume for weddings, parties, or seasonal gifts.
Cost breakdown for one batch (approximately 20 tags):
| Item | Estimated Cost |
|---|---|
| Recycled paper scraps | Free (reused) |
| Seeds (wildflower mix, 1 tsp) | $0.50 to $1.00 |
| Screen/mesh (one-time purchase) | $2.00 to $5.00 |
| Twine for tags | $0.50 to $1.00 |
| Total per batch | $1.00 to $4.00 |
The screen frame is a one-time cost you reuse indefinitely. After the first batch, your per-tag cost drops to just the seed cost, which is negligible. Buying pre-made seed paper tags at retail adds up fast, especially for events with fifty or more guests.
Which Types of Seeds Work Best for Homemade Seed Paper
Small, flat seeds with thin seed coats work best because they survive the blending-adjacent process and embed evenly in the pulp. The seeds are never actually blended; they’re stirred in after the pulp is made. But they do get wet and pressed, so delicate seeds with very thick coats can struggle.
Reliable seed choices for gift tags:
- Wildflower mixes (most forgiving, widely available)
- Basil (fast germinator, small seeds)
- Thyme (tiny seeds, embed beautifully)
- Chamomile (light seeds, quick sprouter)
- Forget-me-nots (classic choice, blue flowers)
- Marigold (slightly larger but still works well)
- Lettuce (good for culinary-themed gifts)
Avoid large seeds like sunflowers, beans, or corn. They’re too bulky for thin paper and tend to fall out during drying. Also avoid seeds with hard, thick coats like morning glory unless you pre-soak them, as the brief moisture exposure in papermaking may not be enough to soften them for germination.
A Step-by-Step Guide to How to Make Handmade Seed Paper for Biodegradable Gift Tags
This process takes about two to three hours of active time, plus overnight drying. Work in a space where water spills are manageable.
Step 1: Prepare the paper pulp Tear recycled paper into one-inch pieces and soak in warm water for at least thirty minutes. For faster results, soak for two hours. The paper should feel soft and mushy before blending.
Step 2: Blend the pulp Add the soaked paper to a blender with fresh water at a ratio of roughly one cup of paper to two cups of water. Blend in short five-second bursts until you get a smooth, oatmeal-like consistency. Do not over-blend or the fibers become too short to hold together.
Step 3: Set up your mold Fill a large basin or plastic tub with several inches of water. Pour the blended pulp into the water and stir gently. Submerge your mesh frame flat, then lift it slowly and evenly so a thin layer of pulp settles across the screen.
Step 4: Add seeds While the pulp is still wet on the screen, sprinkle seeds evenly across the surface. Press them in lightly with your fingertips. Do not add seeds to hot or warm pulp, and do not blend them in, as the blending process can damage seed coats.
Step 5: Press and dry Place a cloth or felt over the seeded pulp and press firmly with a sponge to remove as much water as possible. Flip the frame carefully onto a flat towel, remove the screen, and let the paper sheet dry completely. This usually takes twelve to twenty-four hours depending on humidity.
Step 6: Cut into gift tags Once fully dry, cut the paper into rectangles, squares, or use a craft punch for decorative shapes. Punch a small hole at one end and thread with natural twine or cotton string.
What Are Common Mistakes People Make When First Trying to Make Seed Paper
The most common first-batch failure is paper that falls apart or won’t hold its shape. This almost always comes from pulp that’s too watery or paper that was dried too quickly with heat.
Mistakes to avoid:
- Making the pulp too thin: If your pulp looks like water with a few flecks, it’s too diluted. Add more blended paper or drain some water before lifting the frame.
- Adding seeds to warm pulp: Heat from a recently blended batch can reduce seed viability. Let pulp cool to room temperature first.
- Drying with a hair dryer or oven: High heat kills seeds. Air drying is the only safe method.
- Making the paper too thick: Tags thicker than about 3mm take much longer to biodegrade when planted and can feel stiff and unwieldy.
- Using glossy or coated paper: Magazine pages, receipts, and laminated paper do not break down properly and may contain chemicals that harm seeds. Use plain newsprint, office paper, or egg cartons.
- Skipping the pressing step: Insufficient pressing leaves too much water in the sheet, which causes uneven drying and weak paper.
My first batch years ago fell apart because I skipped pressing entirely and just let the frame drip-dry. The paper crumbled when I tried to cut it. A firm press with a sponge makes all the difference.
Is Seed Paper Really Biodegradable and Environmentally Friendly
Seed paper made from plain recycled paper and untreated seeds is genuinely biodegradable. Soil microbes break down cellulose fiber within one to four weeks under normal garden conditions. No synthetic materials remain.
The environmental benefit is real, but it depends on what goes into the paper. Seed paper made with bleached white office paper, synthetic dyes for coloring, or plastic-coated scraps is less eco-friendly than it appears. For truly green gift tags:
- Use unbleached or lightly colored recycled paper
- Avoid food coloring or synthetic dyes if the goal is full biodegradability (natural dyes from beet juice, turmeric, or spinach are safe alternatives)
- Use organic or untreated seeds when possible
- Tie with cotton or jute twine, not synthetic ribbon
Compared to conventional gift tags, which are often made from virgin paper with plastic coatings and metallic inks, handmade seed paper tags have a substantially lower environmental footprint even in non-ideal conditions.
Can Kids Help Make Seed Paper or Is It Too Complicated
Most children aged six and older can participate meaningfully in seed paper making, with adult supervision for the blending step. The process is hands-on and tactile, which makes it genuinely engaging for kids rather than just a passive activity.
Age-appropriate tasks for children:
- Tearing paper into small pieces (all ages)
- Stirring seeds into the pulp (ages 4 and up)
- Pressing the sponge over the wet paper (ages 6 and up)
- Decorating dried tags with natural stamps or leaf prints (all ages)
- Punching holes and threading twine (ages 8 and up)
Adults should handle the blender and any hot water. The rest of the process is safe and low-risk. Many schools and community craft groups use seed paper making as an environmental education activity precisely because it’s accessible, inexpensive, and produces a tangible result kids can give as gifts or plant themselves.
How Long Does Handmade Seed Paper Take to Grow If Planted
Most seed paper begins sprouting within seven to twenty-one days after planting, assuming adequate moisture, warmth, and light. The paper itself breaks down within one to four weeks in moist soil, releasing seeds as it decomposes.
Germination timeline by seed type:
| Seed Type | Expected Germination |
|---|---|
| Basil | 5 to 10 days |
| Wildflower mix | 7 to 21 days |
| Chamomile | 7 to 14 days |
| Thyme | 14 to 21 days |
| Forget-me-not | 14 to 28 days |
To plant seed paper gift tags, press the tag flat onto moist potting soil or directly into a garden bed. Cover with a thin layer of soil (no more than 3mm deep) and keep consistently moist. Do not bury deeply, as most small seeds need light to germinate.
Where Can I Buy Seeds Specifically for Making Seed Paper
You don’t need specialty “seed paper seeds.” Any fresh, untreated seed from a reputable garden supplier works. The key word is untreated: avoid seeds coated with fungicide or pesticide treatments, which are sometimes used on commercial vegetable seeds.
Good sources for seeds:
- Local nurseries and garden centers (staff can confirm if seeds are untreated)
- Online seed suppliers such as Baker Creek Heirloom Seeds, Botanical Interests, or Seed Savers Exchange
- Bulk herb and spice sections of natural food stores (dried culinary herbs like basil often contain viable seeds)
- Community seed libraries, which exist in many public libraries across the US, Canada, and the UK
Wildflower seed mixes marketed for pollinators are an excellent choice for gift tags because they’re widely available, inexpensive, and produce visually rewarding results for the recipient.
Are There Eco-Friendly Alternatives to Seed Paper for Gift Tags
Seed paper is one of the most sustainable gift tag options, but several alternatives are worth knowing if seed paper doesn’t suit a particular situation.
- Dried leaf tags: Large, sturdy dried leaves (magnolia, eucalyptus) can be written on with a paint pen and attached with twine
- Recycled cardboard tags: Plain kraft cardboard from cereal boxes or packaging, cut and punched, is fully recyclable and compostable
- Fabric tags: Small squares of organic cotton or linen, stamped with natural ink, are reusable and washable
- Plantable clay tags: Air-dry clay mixed with seeds functions similarly to seed paper and holds embossed designs well
Choose seed paper when the recipient is likely to plant it. Choose recycled cardboard when planting isn’t realistic (urban apartment dwellers, for example). Fabric tags work best for gifts that will be kept and reused.
What Happens If My Seed Paper Doesn’t Sprout After Planting
Seed paper that fails to germinate is almost always caused by one of four fixable problems. The paper itself is not the issue in most cases.
Troubleshooting non-sprouting seed paper:
- Planted too deep: Most seeds in seed paper need to be at or just below the soil surface. Burying the tag more than half a centimeter deep blocks light and prevents germination.
- Insufficient moisture: Seed paper must stay consistently moist for the first two weeks. If it dries out even once during early germination, seeds can fail.
- Old or heat-damaged seeds: Seeds that were exposed to high heat during drying (from a hair dryer or warm oven) may have lost viability. Always air-dry seed paper.
- Wrong season: Planting cold-season seeds in summer or warm-season seeds in winter will delay or prevent germination. Match seed type to the planting season.
If none of these apply, try pressing a fresh piece of seed paper onto a damp paper towel in a warm spot indoors. If seeds sprout within a week, the soil conditions were the problem, not the paper.
FAQ
Can I use any type of paper to make seed paper? Plain recycled paper works best: newspaper, office paper, egg cartons, and paper bags. Avoid glossy magazine pages, receipts, waxed paper, or any paper with plastic coatings, as these don’t break down properly and may contain chemicals harmful to seeds.
How do I store finished seed paper gift tags before use? Store dried seed paper tags in a cool, dry place away from direct sunlight. A paper envelope or cardboard box works well. Avoid plastic bags, which can trap moisture and trigger premature germination. Properly stored tags remain viable for six to twelve months.
Do I need a special blender for making paper pulp? No. A standard kitchen blender works fine. Rinse it thoroughly after use. If you make seed paper regularly, consider keeping a dedicated thrift-store blender for craft use so you don’t mix paper pulp with food prep.
Can I add color to my seed paper? Yes, but use natural colorants to keep the paper truly eco-friendly. Beet juice creates pink tones, turmeric produces yellow, and spinach juice gives a pale green. Add the colorant to the pulp before spreading on the screen.
How thick should seed paper gift tags be? Aim for about 2 to 3mm thickness, similar to thin cardstock. Thinner paper tears easily when punching holes. Thicker paper takes longer to biodegrade when planted and feels heavy as a tag.
Is seed paper waterproof enough to use as an outdoor gift tag? No. Seed paper is not water-resistant. If tags will be used outdoors or in humid conditions, attach them at the last moment before gifting, or keep them in a small glassine envelope until needed.
Can I write on seed paper with a regular pen? Yes, a ballpoint or felt-tip pen works on dried seed paper. The surface is slightly textured, so fine-tip pens work better than broad markers. Avoid pressing too hard, as the paper can be more fragile than commercial cardstock.
What’s the best seed paper recipe for a complete beginner? Start with egg cartons (no blending needed if soaked long enough), wildflower seeds, and a simple picture frame mold. Egg carton pulp is forgiving, breaks down quickly in soil, and produces sturdy tags on the first try.
Conclusion
Learning how to make handmade seed paper for biodegradable gift tags is one of those rare craft projects where the process is as satisfying as the result. You’re recycling paper that would otherwise be discarded, embedding something living into it, and handing someone a gift that keeps going after the wrapping is long gone.
Your next steps:
- Gather your supplies this week: a picture frame, window screen, and a packet of wildflower seeds are all you need to start.
- Run a test batch before any event or holiday so you can troubleshoot thickness and drying time without pressure.
- Label your tags with the seed type so recipients know what to plant and when.
- Share the method with anyone who asks about the tags. The idea spreads faster than the seeds.
The barrier to entry is genuinely low. One afternoon, a blender, and some paper scraps are enough to produce twenty tags that cost almost nothing and leave nothing behind but flowers.
References
- Hiebert, H. (2000). The Papermaker’s Companion: The Ultimate Guide to Making and Using Handmade Paper. Storey Publishing.
- Seed Savers Exchange. (2023). Seed Saving Guide. https://www.seedsavers.org
- Baker Creek Heirloom Seeds. (2024). Seed Catalog and Planting Guide. https://www.rareseeds.com
- Botanical Interests. (2024). Germination Guide by Seed Type. https://www.botanicalinterests.com
Read next: Ergonomic Adjustments for Professional Watchmakers: A Complete Guide. A closer look at ergonomics for watchmakers.