
Key Takeaways
- Japanese chisels (nomi) use a hard steel edge laminated to a softer iron body, making them sharper but more brittle than Western chisels
- The hollow back (ura) on Japanese chisels is a design feature, not a defect — it makes flattening the back faster and more precise
- Sharpen the back first, then the bevel; skipping this step is the most common beginner mistake
- Use waterstones (also called whetstones) with a progression from 1,000 to 6,000 or 8,000 grit for best results
- The correct sharpening angle for most Japanese chisels is 25 to 30 degrees
- A basic sharpening setup costs between $80 and $200 for quality entry-level stones
- Sharpen when the chisel feels dull or leaves torn grain, not on a fixed schedule
- Japanese chisels are worth the extra maintenance effort for anyone who values precision joinery
- Beginners should learn to sharpen themselves rather than relying on a professional for routine maintenance
- Top beginner-friendly Japanese chisel brands include Narex (Japanese-style), Tasai, Ouchi, and Suizan
What Makes Japanese Chisels Different from Western Chisels
Japanese chisels differ from Western chisels in their steel construction, geometry, and sharpening requirements. A Japanese chisel uses a laminated blade: a thin layer of very hard high-carbon steel (hagane) forge-welded to a softer iron or steel body (jigane). This produces an edge that is significantly harder — often 60 to 65 HRC compared to 58 to 60 HRC for most Western chisels — and capable of holding a finer edge.
The most visible difference is the hollow back (ura). Instead of a flat back, Japanese chisels have a concave recess ground into the flat face. This hollow serves two purposes: it reduces the surface area that needs to be flattened during sharpening, and it creates a natural guide that helps the woodworker maintain a flat reference surface. The steel hoop (sometimes called the “ring” or “kanji”) on the handle is also functional — it prevents the wooden handle from splitting under mallet blows.
Key structural differences at a glance:
| Feature | Japanese Chisel | Western Chisel |
|---|---|---|
| Steel construction | Laminated (hard + soft) | Single alloy steel |
| Typical hardness | 60-65 HRC | 56-60 HRC |
| Back geometry | Hollow (ura) | Flat |
| Handle attachment | Tang with steel hoop | Socket or tang |
| Bevel angle | 25-30 degrees | 25-35 degrees |
| Edge retention | Higher | Moderate |
| Sharpening difficulty | Moderate to high | Low to moderate |
Choose Japanese chisels if you want the finest possible edge for precision joinery, paring, or hand-cut mortises. Stick with Western chisels if you’re primarily doing rough work or want a more forgiving tool that’s easier to maintain.
What Angle Should I Sharpen My Japanese Chisels At
For most Japanese bench chisels (oire nomi), the correct sharpening angle is 25 to 30 degrees. Lighter paring chisels (usunomi) are typically sharpened closer to 20 to 25 degrees because they’re used with hand pressure only and don’t take mallet blows.
Getting the angle right matters more with Japanese chisels than with Western ones because the hard steel is less forgiving of an incorrect geometry. Too steep an angle (above 35 degrees) wastes the edge’s potential. Too shallow (below 20 degrees) risks chipping the brittle high-carbon steel.
Practical angle guidance:
- Oire nomi (bench chisels): 25 to 30 degrees
- Usunomi (paring chisels): 20 to 25 degrees
- Mortise chisels (mukoumachi nomi): 30 to 35 degrees
A honing guide is strongly recommended for beginners. It removes the guesswork and produces a consistent bevel every time. Once you’ve sharpened a chisel a dozen times with a guide, you’ll develop the muscle memory to freehand it reliably.
What Tools Do I Need to Properly Sharpen Japanese Chisels
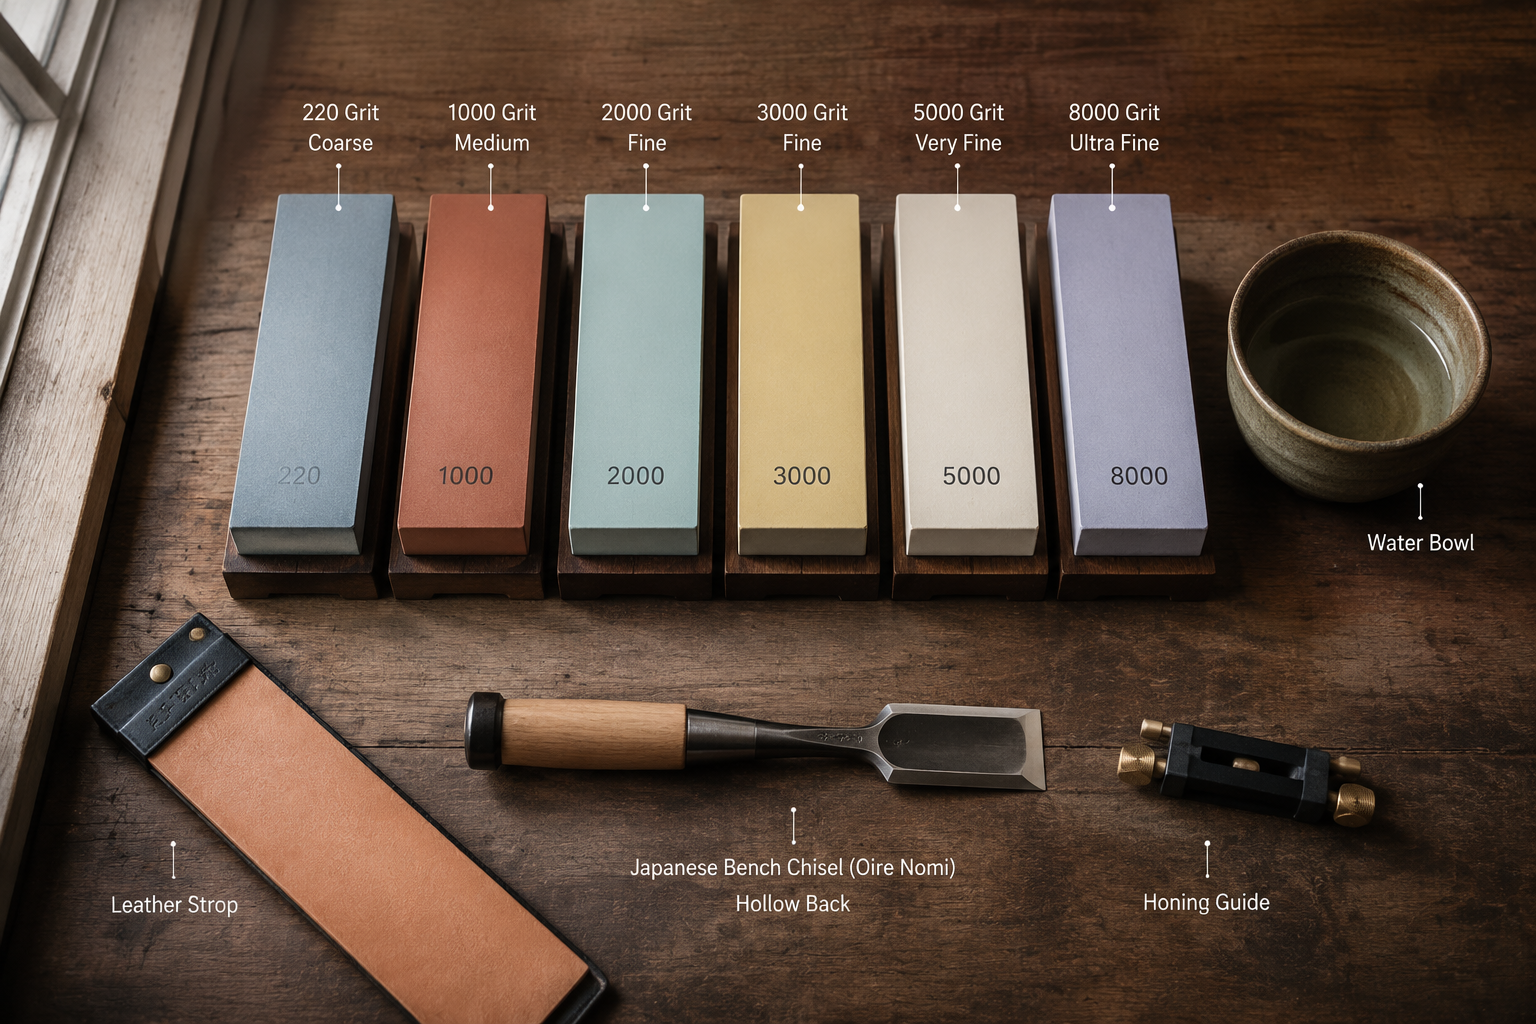
You need a progression of waterstones, a flattening plate, and optionally a honing guide and leather strop. That’s the complete setup for most amateur woodworkers.
Essential tools:
- Coarse waterstone (220 to 400 grit): For repairing damaged edges or establishing a new bevel. Use only when needed.
- Medium waterstone (1,000 grit): The main workhorse for regular sharpening.
- Fine waterstone (3,000 to 6,000 grit): Refines the edge and removes scratches from the medium stone.
- Polishing stone (8,000 grit): Produces a mirror polish and the final cutting edge.
- Flattening plate or lapping plate: Keeps your stones flat. A diamond plate or a piece of float glass with silicon carbide powder works well.
- Water or nagura stone: For lubricating and raising a slurry on your stones.
- Honing guide (optional but recommended for beginners): Holds the chisel at a consistent angle.
- Leather strop with honing compound: For maintaining the edge between full sharpenings.
How Much Does a Good Japanese Chisel Sharpening Stone Cost
A functional sharpening stone setup for Japanese chisels costs between $80 and $200 for quality entry-level equipment. You don’t need to spend more than that to get excellent results as a beginner.
Realistic cost breakdown (2026 estimates):
| Item | Budget Option | Mid-Range Option |
|---|---|---|
| Combination stone (1,000/6,000 grit) | $30-$50 | $60-$90 |
| Finishing stone (8,000 grit) | $25-$40 | $50-$80 |
| Diamond flattening plate | $20-$35 | $40-$70 |
| Honing guide | $15-$25 | $30-$50 |
| Leather strop | $15-$25 | $25-$45 |
| Total estimate | $105-$175 | $205-$335 |
The King brand combination stone (1,000/6,000 grit) is a reliable budget entry point widely available online and in woodworking stores. For a mid-range upgrade, Shapton and Naniwa stones are respected by both hobbyists and professional craftspeople.
Common mistake: Buying an 8,000-grit stone first and skipping the medium grits. A polishing stone can’t fix a poorly shaped bevel — you need the full progression.
Steps to Sharpen a Japanese Chisel for Beginners
Sharpening a Japanese chisel follows a specific sequence: flatten the back first, then shape and refine the bevel. Skipping or reversing these steps produces a poor edge regardless of stone quality.
Step-by-step sharpening process:
Flatten your stones. Before anything else, run your waterstone across a diamond plate or lapping plate until it’s perfectly flat. A dished stone creates a convex bevel, which is nearly impossible to fix later.
Soak or splash your stones. Most Japanese waterstones need 5 to 10 minutes of soaking (or continuous water splashing for splash-and-go stones). Check the manufacturer’s recommendation.
Flatten the hollow back (ura). Place the flat face of the chisel on your medium stone (1,000 grit) and rub it in small circles, keeping the entire flat face in contact. You’re only polishing the two raised edges on either side of the hollow — not filling in the hollow. Work until you see a consistent scratch pattern across both edges. Repeat on finer stones.
Work the bevel. Set your chisel in the honing guide at the correct angle (25 to 30 degrees for bench chisels). Push the bevel flat against the stone and use even, forward strokes. Apply moderate pressure on the forward stroke, light pressure on the return. Work through your stone progression: 1,000 grit, then 3,000 to 6,000, then 8,000.
Check for a burr. After working the bevel on the 1,000-grit stone, run your thumb across the flat back of the chisel near the edge. You should feel a slight wire edge (burr) on the back. This confirms you’ve sharpened all the way to the edge.
Remove the burr. Make two or three light passes of the flat back on your finest stone, then alternate: one stroke on the bevel, one on the back, until the burr is gone.
Strop. Pull the chisel (bevel down) across a leather strop loaded with honing compound five to ten times per side. This aligns the final edge and removes any remaining micro-burr.
Test the edge. Slice across end grain pine or shave arm hair. A properly sharpened Japanese chisel should cut cleanly with almost no pressure.
Can I Use Regular Whetstones or Do I Need Special Japanese Stones
You can use any quality waterstone with Japanese chisels — the tool doesn’t require a stone made in Japan. However, Japanese waterstones (both natural and synthetic) are particularly well-suited because they cut quickly, produce a fine slurry that polishes as you work, and are available in very high grits (up to 30,000) for mirror-polishing the hard hagane steel.
Oil stones (Arkansas stones, India stones) are not recommended for Japanese chisels. The oil can contaminate the pores of the stone and the steel, and oil stones cut more slowly on very hard steel. If you already own oil stones, they’ll work in a pinch on the bevel, but switching to waterstones will produce noticeably better results.
Stone types compared:
- Japanese synthetic waterstones (King, Shapton, Naniwa): Best all-around choice. Fast cutting, wide grit range, affordable.
- Natural Japanese stones (jnats): Excellent for final polishing. Expensive ($100 to $500+) and variable in quality. Not necessary for beginners.
- Diamond plates: Good for coarse work and flattening other stones. Too aggressive for final polishing.
- Oil stones: Avoid for Japanese chisels if possible.
Common Mistakes Amateur Woodworkers Make When Sharpening Japanese Chisels
The most damaging mistake is grinding away the hollow back. The ura is a precision feature — once it’s gone, the chisel is much harder to sharpen correctly. Never grind the flat face on a bench grinder or use heavy pressure that removes significant steel from the back.
Other frequent errors:
- Rounding the bevel. Inconsistent angle during sharpening creates a convex bevel that can’t be honed to a true edge. Use a honing guide until your technique is solid.
- Skipping stone grits. Going straight from 1,000 to 8,000 grit leaves deep scratches that the polishing stone can’t remove efficiently.
- Using a dry stone. Waterstones need water to cut properly and to prevent clogging. Keep them wet throughout the process.
- Neglecting to flatten stones. A dished stone is probably the single biggest cause of poor results for beginners.
- Over-thinning the hollow back. Each time you sharpen, you remove a tiny amount of steel from the back. If you work too aggressively, you’ll eventually need to re-establish the hollow — a job best left to a professional or done carefully with a bench grinder.
- Sharpening only the bevel. The back and bevel must both be polished for a clean edge. Neglecting the back leaves a rough surface that limits sharpness.
Why Do My Japanese Chisels Keep Losing Their Edge Quickly
Fast edge loss in Japanese chisels is almost always caused by one of three things: incorrect sharpening angle, a micro-bevel that wasn’t fully removed, or using the chisel on materials it wasn’t designed for.
Troubleshooting rapid edge loss:
- Check your angle. If you’re sharpening below 20 degrees on a bench chisel, the thin edge will chip or roll quickly. Move to 25 to 30 degrees.
- Look for a remaining burr. A burr that folds back and forth eventually breaks off, taking the edge with it. Strop more thoroughly and alternate back/bevel strokes at the end of sharpening.
- Avoid hitting nails, screws, or grit. Japanese high-carbon steel is harder but more brittle than Western steel. A single encounter with a hidden fastener can chip the edge severely.
- Don’t use Japanese chisels on MDF, particleboard, or abrasive composites. The abrasive resins in these materials dull any edge fast, but they’re especially punishing on hard steel.
- Check your stone flatness. A convex bevel (caused by a dished stone) contacts the wood on a curved surface, which concentrates stress and causes faster wear.
How Often Should I Sharpen My Japanese Woodworking Chisels
Sharpen when the chisel feels like it’s pushing rather than cutting, or when it leaves torn grain instead of a clean surface. There’s no fixed schedule — frequency depends entirely on how much you use the tool and what you’re cutting.
For a hobbyist working a few hours per week on hardwood joinery, a full sharpening session every two to four weeks is typical. Between sessions, a few passes on a leather strop (30 seconds of work) can extend the edge significantly.
A practical maintenance rhythm:
- Before each session: 5 to 10 strops per side on a loaded leather strop
- Every few sessions: 10 to 20 passes on an 8,000-grit stone, then strop
- When the edge is visibly dull or chipped: full sharpening progression from 1,000 grit up
Are Japanese Chisels Worth the Extra Effort to Maintain
Yes, for woodworkers who do precision hand work, Japanese chisels are worth the maintenance. The harder steel holds an edge longer between full sharpenings, and the hollow back makes the back-flattening step faster than with a solid flat-backed Western chisel. The trade-off is that when the edge does need attention, you need the right stones and technique — you can’t just run it across a cheap oil stone and call it done.
For someone doing rough carpentry, building site work, or primarily machine-assisted joinery, the extra care isn’t justified. But for hand-cut dovetails, mortise and tenon joints, or any work where surface quality matters, the performance difference is real and noticeable.
Best Brands of Japanese Chisels for Woodworking Newbies
For beginners, the best Japanese chisels balance quality, availability, and price. Spending $300 on a set of Tasai chisels before you’ve learned to sharpen them properly is a common and expensive mistake.
Recommended beginner-to-intermediate brands:
- Suizan: Widely available, affordable ($60 to $120 for a set), and well-made for the price. A solid starting point.
- Ouchi: Slightly higher quality steel and fit, around $80 to $150 per set. Popular in the hobbyist community.
- Narex (Japanese-style): A Czech brand that makes Japanese-profile chisels at Western prices. Good for learning technique before investing in Japanese steel.
- Tasai and Iyoroi: Professional-grade brands worth considering once you’re confident in your sharpening skills. Expect to pay $50 to $150 per individual chisel.
Avoid: Unbranded sets sold at very low prices on general retail sites. The steel quality is inconsistent and some arrive with backs that are impossible to flatten properly.
Should I Send My Chisels to a Professional or Learn to Sharpen Myself
Learn to sharpen yourself. For routine maintenance, sending chisels to a professional sharpener costs $10 to $20 per chisel and takes days or weeks. Once you can sharpen reliably, you can touch up an edge in under five minutes at your bench.
Professional sharpening makes sense in two specific situations: when a chisel arrives from the factory with a poorly ground bevel that needs significant steel removal, or when the hollow back has been worn away and needs to be re-established. Both of these are tasks that require a bench grinder or surface grinder and some experience. Outside of those cases, learning to sharpen is a skill that pays for itself quickly and makes you a better woodworker in the process.
The art of sharpening Japanese chisels — as a guide for amateur woodworkers — is ultimately a skill built through repetition, not a mystery reserved for experts. Most beginners reach a functional sharpening level within three to five practice sessions.
Conclusion
The art of sharpening Japanese chisels: a guide for amateur woodworkers comes down to understanding the tool’s construction, using the right stones in the right order, and building consistent technique. The hollow back is your friend, not a complication. The hard steel rewards patience and proper grit progression with an edge that feels almost unreasonably sharp.
Actionable next steps:
- Start with a King 1,000/6,000 combination stone and a diamond flattening plate — this $60 to $80 investment covers 90% of your sharpening needs.
- Flatten your stone before every session. This one habit separates woodworkers who struggle with sharpening from those who don’t.
- Buy a honing guide and use it until you can hold a consistent angle freehand.
- Practice on an inexpensive chisel before working on a prized set. Old chisels from flea markets are ideal for learning.
- Add a leather strop to your bench and use it before every session — it’s the fastest way to extend time between full sharpenings.
- Once you’re comfortable, consider upgrading to a Shapton or Naniwa 8,000-grit stone for a noticeably finer final edge.
Sharp tools are safer tools. They require less force, give you more control, and produce cleaner results. The time you invest in learning to sharpen properly is time that pays back every single hour you spend at the bench.
Frequently Asked Questions
Q: Do I need to soak Japanese waterstones before using them? A: It depends on the stone. Traditional Japanese waterstones (like King brand) need 5 to 10 minutes of soaking. Splash-and-go stones (like Shapton) only need water applied to the surface during use. Check the manufacturer’s instructions for your specific stone.
Q: Can I sharpen Japanese chisels on a belt sander or bench grinder? A: A bench grinder can be used for major repairs or bevel reshaping, but only with a slow-speed grinder and careful technique. The hard hagane steel overheats quickly and loses its temper if you’re not careful. For routine sharpening, stick to waterstones.
Q: What does the hollow back (ura) look like when it’s worn out? A: When the hollow is worn away, the entire back of the chisel looks flat or slightly convex. You’ll also notice that flattening the back takes much longer because there’s more surface area in contact with the stone. At this point, the chisel needs professional re-hollowing.
Q: Is there a difference between sharpening a new Japanese chisel and a used one? A: Yes. New Japanese chisels often arrive with a factory grind that isn’t fully sharp — you need to flatten the back and refine the bevel before first use. Used chisels may have accumulated sharpening errors (rounded bevels, worn hollows) that need correcting before normal maintenance can resume.
Q: How do I know if my sharpening angle is correct without a protractor? A: Use a honing guide with a built-in angle setting, or measure the bevel length and use a simple trigonometry calculation (for a 25-degree bevel on a 3mm thick chisel, the bevel length is about 7mm). Many honing guides include a setup block that sets common angles automatically.
Q: Can I use the same stones for Japanese and Western chisels? A: Yes. Waterstones work on all steel types. Just clean the stone between uses if you’re switching between significantly different steel hardnesses, and re-flatten the stone regularly regardless of which tool you’re sharpening.
Q: My chisel has a chip in the edge. What grit do I start with? A: Start with a 220 to 400-grit coarse stone to remove steel quickly and get past the chip. Once the edge is straight again, work through your normal progression. For a large chip (more than 1mm), a slow-speed bench grinder will save significant time.
Q: Should I use a secondary bevel (micro-bevel) on Japanese chisels? A: Most traditional Japanese sharpening practice avoids micro-bevels, preferring a single flat bevel. Micro-bevels work fine on Western chisels but can complicate the geometry on Japanese chisels where the bevel angle is already optimized. Stick to a single bevel until you’re comfortable with the basics.
Q: How do I store Japanese chisels to protect the edge? A: Store them in a chisel roll, a wooden rack, or with individual blade guards (some chisels come with these). Never store them loose in a drawer where the edges can contact each other or other metal tools.
Q: Are there any Japanese chisel sharpening techniques specific to left-handed woodworkers? A: The sharpening technique is the same regardless of hand dominance. The motion is symmetric on a flat stone. Some woodworkers prefer to pull rather than push on the stone — experiment to find what gives you the most control and consistent pressure.
References
- Odate, Toshio. Japanese Woodworking Tools: Their Tradition, Spirit and Use. Linden Publishing, 1984.
- Charron, Andrew. Sharp: The Definitive Guide to Sharpening. Taunton Press, 2016.
- Schwarz, Christopher. “Sharpening Japanese Chisels.” Popular Woodworking Magazine, 2011. popularwoodworking.com
- Wilbur Pan. “Understanding the Ura: The Hollow Back of Japanese Chisels.” Giant Cypress (woodworking blog), 2013. giantcypress.net
Read next: Identifying and Cleaning Foxing Stains on 19th-Century Paper Prints. A closer look at removing foxing stains.