
Key Takeaways
- Air drying is the easiest and cheapest method for drying herbs in small kitchens, requiring only twine and a hook or curtain rod.
- Herbs with low moisture content — rosemary, thyme, oregano, sage, and lavender — dry best using traditional air-drying methods.
- High-moisture herbs like basil and mint need faster methods (oven or microwave) to prevent mold in humid environments.
- Hanging bundles of 5 to 10 stems in a warm, ventilated spot is the most space-efficient approach for small apartments.
- Mold is the biggest risk in small, poorly ventilated spaces; small bundles and paper bag covers reduce this risk significantly.
- Oven drying at 170 to 200 degrees Fahrenheit takes 1 to 4 hours and is a reliable backup when air drying is too slow.
- Properly dried herbs stored in airtight glass jars away from heat and light retain potency for 1 to 3 years.
- Drying your own herbs can save between 60 and 80 percent compared to buying pre-packaged dried herbs at grocery stores (based on average retail price comparisons in 2026).
- You need minimal tools: kitchen twine, a mesh cooling rack or window screen, paper bags, and small glass jars for storage.
- Small apartments with no outdoor space can still produce excellent dried herbs using interior walls, cabinet handles, or a tension rod over a window.
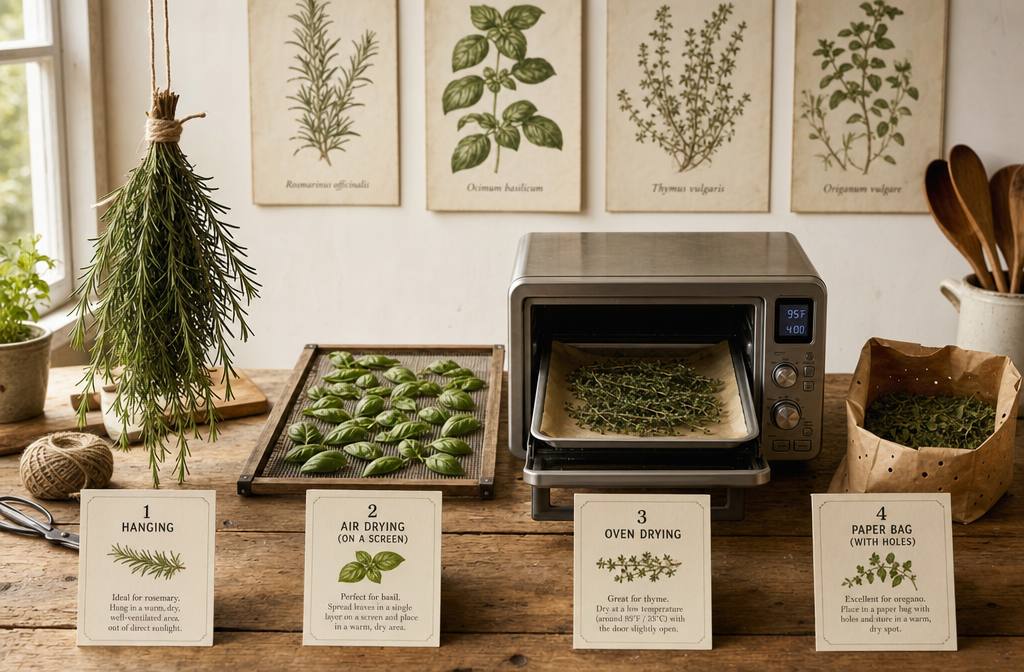
What Is the Easiest Way to Air Dry Herbs in a Tiny Apartment Kitchen?
The easiest method is the hanging bundle technique: tie 5 to 10 clean herb stems together with kitchen twine and hang them upside down in a warm, dry spot with decent airflow. No equipment purchase is needed, and the method works in spaces as small as a studio apartment.
Here is how to do it step by step:
- Harvest herbs in the morning after any dew has dried, just before the plant flowers (flavor is strongest at this stage).
- Remove lower leaves and shake off any insects or debris.
- Tie stems loosely at the base with kitchen twine — loose enough to allow air to circulate between stems.
- Hang upside down from a curtain rod, cabinet handle, tension rod, or a small hook on an interior wall.
- Avoid direct sunlight, which fades color and degrades essential oils.
- Check after one week by crumbling a leaf between your fingers. Fully dried herbs crumble cleanly with no soft or rubbery feel.
Best spots in a small kitchen: above the refrigerator (warm air rises), near a window with indirect light, or along an interior wall away from the stove’s steam.
Common mistake: Tying bundles too thick. A bundle thicker than your thumb traps moisture in the center and invites mold. Keep it slim.
Which Herbs Work Best for Traditional Air Drying Methods?
Herbs with low natural moisture content are the best candidates for traditional air drying. Woody-stemmed herbs like rosemary, thyme, oregano, marjoram, and sage lose moisture slowly and evenly, making them nearly foolproof for beginners practicing drying herbs in small spaces.
| Herb | Air Drying Suitability | Notes |
|---|---|---|
| Rosemary | Excellent | Retains oils well; takes 1-2 weeks |
| Thyme | Excellent | Small leaves dry quickly and evenly |
| Oregano | Excellent | Classic air-dry herb; very forgiving |
| Sage | Good | Larger leaves; use loose bundles |
| Lavender | Excellent | Dries beautifully; also decorative |
| Mint | Fair | Higher moisture; watch for mold |
| Basil | Poor | Very high moisture; prone to blackening |
| Parsley | Fair | Flat-leaf dries better than curly |
| Cilantro | Poor | Best dried by oven or dehydrator |
| Bay Leaves | Excellent | Lay flat on a screen; 2-3 weeks |
Choose air drying if: your herb has woody stems, small leaves, or a naturally low water content.
Choose oven or microwave drying if: you’re working with basil, cilantro, or any herb in a particularly humid kitchen environment.
How Long Do Different Herbs Take to Dry Completely?
Most herbs air dry completely within 1 to 3 weeks, depending on the herb’s moisture content, bundle thickness, and the humidity of your kitchen. Oven drying compresses this to 1 to 4 hours.
Drying times vary significantly between methods:
Air Drying (Hanging or Screen)
- Rosemary, thyme, oregano: 1 to 2 weeks
- Sage, marjoram, lavender: 1 to 2 weeks
- Mint, lemon balm: 2 to 3 weeks
- Parsley (flat-leaf): 2 to 3 weeks
- Bay leaves (flat on screen): 2 to 4 weeks
Oven Drying (170-200°F / 77-93°C)
- Most herbs: 1 to 4 hours
- Thicker-leafed herbs (sage, bay): up to 4 hours
- Delicate herbs (thyme, dill): 1 to 2 hours
Microwave Drying
- Most herbs: 1 to 3 minutes total (in 30-second intervals)
How to test for doneness: Rub a leaf between two fingers. If it crumbles to powder, it’s done. If it bends or feels leathery, it needs more time. A soft or damp feel means moisture is still present — do not jar these herbs or mold will develop within days.
Can I Dry Herbs Without a Dehydrator Using Just My Kitchen?
Yes, absolutely. A dehydrator is convenient but not necessary for drying herbs in small spaces using traditional kitchen methods. Three reliable dehydrator-free approaches work well in any kitchen: air hanging, oven drying, and microwave drying.
Air hanging is the most traditional and requires only twine and a hook. It’s free, hands-off, and produces excellent flavor retention in low-humidity environments.
Oven drying uses your existing oven set to its lowest temperature (ideally 170°F or below). Spread herbs in a single layer on a parchment-lined baking sheet. Leave the oven door slightly ajar to allow moisture to escape. Check every 30 minutes.
Microwave drying works for small quantities. Place herbs between two paper towels on a microwave-safe plate. Microwave on high for 1 minute, then check and continue in 30-second bursts until dry. This method is fast but can over-dry or scorch herbs if you’re not attentive.
Edge case: If you live in a very humid climate (above 60 percent relative humidity consistently), air drying alone may not work reliably. In that case, oven drying is the more dependable choice for drying herbs in small spaces with traditional kitchen methods.
Are There Any Risks of Mold When Drying Herbs in a Small Space?
Mold is the primary risk when drying herbs in a small, poorly ventilated kitchen. It develops when moisture cannot escape from the herb bundle fast enough, particularly in bundles that are too thick or in rooms with high humidity.
Signs of mold: white or gray fuzzy growth on stems or leaves, a musty smell, or leaves turning dark and slimy rather than crisp.
How to prevent mold:
- Keep bundles to 5 to 10 stems maximum — never a thick fistful.
- Ensure airflow on all sides of the bundle; don’t press bundles against a wall.
- Use a small electric fan on low nearby if your kitchen tends to be humid.
- For herbs prone to mold (mint, basil, parsley), place a loose paper bag with several punched holes over the hanging bundle. The bag blocks dust, slows light exposure, and still allows air circulation.
- Never dry herbs that are still wet from washing. Pat them completely dry with a paper towel first, or let them air out for 30 minutes before bundling.
If mold appears: discard the affected bundle entirely. Do not try to salvage moldy herbs for culinary use.
What Kitchen Tools Do I Need to Successfully Dry Herbs?
You need very little. The core tools for drying herbs in small spaces using traditional methods are items most kitchens already have.
Essential tools:
- Kitchen twine or rubber bands (for hanging bundles)
- A hook, tension rod, or curtain rod (for hanging)
- A mesh cooling rack or clean window screen (for flat drying)
- Paper bags (optional, for covering bundles)
- Parchment paper (for oven drying)
- A baking sheet (for oven drying)
- Small glass jars with tight lids (for storage)
- Adhesive labels and a marker (for dating and labeling jars)
Nice to have but not required:
- A small hygrometer (to monitor kitchen humidity)
- A food thermometer (to verify oven temperature accuracy)
- A mortar and pestle (for grinding dried herbs after drying)
Total cost to get started from scratch: under $15 in 2026, assuming you already own a baking sheet and oven. The twine, hooks, and jars are the only likely purchases.
How Do Fresh Herb Drying Times Compare Between Hanging and Screen Methods?
Hanging and screen (flat) drying produce similar results, but the best choice depends on the herb’s stem structure. Hanging works better for stemmed herbs like rosemary and thyme; screen drying works better for individual leaves or flowers like bay leaves and lavender buds.
Hanging method: Herbs hang upside down, which draws moisture away from the leaves and toward the stem end. This preserves leaf shape and color well. Drying time: 1 to 3 weeks.
Screen/flat method: Herbs are spread in a single layer on a mesh surface with airflow above and below. This is better for large individual leaves (sage, bay) or flowers. Drying time is similar — 1 to 3 weeks — but the flat position can cause slight discoloration on the underside if the screen lacks airflow below.
Comparison summary:
| Factor | Hanging | Screen/Flat |
|---|---|---|
| Space needed | Vertical (wall/ceiling) | Horizontal (counter/table) |
| Best for | Stemmed herbs | Leaves, flowers, buds |
| Airflow | Natural (all sides) | Needs elevation for bottom |
| Ease of setup | Very easy | Easy |
| Risk of mold | Low (with slim bundles) | Low (with single layer) |
In a truly tiny kitchen, hanging wins on space efficiency because it uses vertical space rather than precious counter area.
Can People with Small Apartments or No Outdoor Space Still Dry Herbs Effectively?
Yes. Outdoor space is not required for drying herbs in small spaces using traditional kitchen methods. Many apartment dwellers successfully dry herbs year-round using only interior walls, cabinet hardware, and tension rods.
Practical spots in a small apartment:
- A tension rod installed inside a cabinet (keeps herbs out of sight and in a dark, dry space)
- Cabinet door handles along an interior wall
- A small hook on the inside of a pantry door
- A clothes drying rack repurposed in a corner of the kitchen
- A window-mounted tension rod (indirect light only — keep herbs out of direct sun)
The key factor is not space size but air circulation and low humidity. A well-ventilated apartment kitchen — even a galley kitchen of 50 square feet — can produce perfectly dried herbs. If your apartment runs humid (common in coastal cities or older buildings), a small USB-powered fan near the drying area makes a significant difference.
What Is the Difference Between Air Drying and Oven Drying Herbs?
Air drying is a slow, passive process that preserves volatile oils and flavor better; oven drying is fast and controlled but can degrade delicate aromatic compounds if the temperature is too high. For most culinary herbs, the flavor difference is subtle when oven drying is done correctly at low temperatures.
| Factor | Air Drying | Oven Drying |
|---|---|---|
| Time required | 1 to 3 weeks | 1 to 4 hours |
| Equipment | Twine, hook | Oven, baking sheet |
| Flavor retention | Excellent | Good (at low temps) |
| Energy cost | None | Low (short duration) |
| Risk of over-drying | Very low | Moderate (needs monitoring) |
| Best for | Woody herbs | Delicate or high-moisture herbs |
| Humidity sensitivity | High | Low |
Choose air drying if you have 1 to 3 weeks, low kitchen humidity, and woody-stemmed herbs.
Choose oven drying if you need dried herbs quickly, live in a humid environment, or are working with basil, cilantro, or other high-moisture herbs.
How Much Money Can I Save by Drying Your Own Herbs?
Drying your own herbs can save between 60 and 80 percent compared to buying pre-packaged dried herbs at grocery stores, based on a comparison of fresh herb prices versus retail dried herb prices in 2026. A small bunch of fresh thyme or rosemary costing $1.50 to $2.00 yields roughly the same volume of dried herb as a $5 to $7 retail jar.
Example calculation (approximate, 2026 retail prices):
- Fresh rosemary, 1 oz bunch: $1.99
- Dried rosemary yield from 1 oz fresh: approximately 0.25 oz (herbs lose 75-80% of weight when dried)
- Retail cost of 0.25 oz dried rosemary: approximately $1.50 to $2.00
- Cost per year if you use one jar per month: $18 to $24 retail vs. $5 to $8 growing/buying fresh and drying at home
The savings multiply significantly if you grow herbs yourself from seed (a packet of herb seeds costs $2 to $4 and produces dozens of harvests). For households that cook frequently with herbs, the annual savings can easily reach $50 to $150 depending on variety and usage.
How Should I Store Dried Herbs After They Are Completely Dehydrated?
Store dried herbs in airtight glass jars, away from heat, light, and moisture. Properly stored herbs retain peak flavor for 1 to 3 years for whole-leaf herbs and 6 to 12 months for crumbled or ground herbs.
Storage best practices:
- Use small glass jars with tight-fitting lids (mason jars or recycled spice jars work well).
- Label each jar with the herb name and drying date.
- Store in a cool, dark cabinet — not above the stove or near the dishwasher where heat and steam are constant.
- Avoid clear jars on open shelves exposed to sunlight; UV light degrades essential oils.
- Do not store herbs in plastic bags long-term; plastic allows trace moisture exchange and can impart off-flavors.
Test for potency before use: Rub a pinch between your fingers and smell it. If the aroma is faint or absent, the herb has lost its potency and should be replaced. Dried herbs that smell strong and vibrant will deliver full flavor in cooking.
What Common Mistakes Do Beginners Make When Drying Herbs at Home?
The most common beginner mistakes are making bundles too thick, skipping the drying test before storage, and placing herbs in direct sunlight. Each of these errors either causes mold, loss of flavor, or poor storage outcomes.
Top mistakes and how to avoid them:
- Bundles too thick: Traps moisture in the center. Fix: keep bundles to 5 to 10 stems.
- Drying in direct sunlight: Bleaches color and destroys volatile oils. Fix: use indirect light or a dark, ventilated space.
- Jarring herbs before fully dry: Residual moisture causes mold in the jar within days. Fix: always do the crumble test first.
- Washing herbs and not drying them first: Water on leaves dramatically slows drying and promotes mold. Fix: pat completely dry before bundling.
- Using the wrong method for the herb: Trying to air dry basil in a humid kitchen. Fix: match the method to the herb’s moisture content (see the table above).
- Storing in clear jars on a sunny windowsill: Looks beautiful, destroys the herbs within weeks. Fix: dark cabinet, always.
- Harvesting at the wrong time: Harvesting after the plant has flowered reduces essential oil content. Fix: harvest just before flowering for maximum flavor.
FAQ
Can I dry herbs in my car on a hot day? Yes. A car parked in the sun can reach temperatures of 130 to 170°F, which effectively dries herbs spread on a tray on the back seat within a few hours. Use a mesh tray or paper towel layer and leave a window cracked slightly for airflow. This works well in summer but is not a reliable year-round method.
Do dried herbs lose nutritional value compared to fresh? Yes, some heat-sensitive vitamins (particularly vitamin C) degrade during drying. However, many minerals and antioxidants are retained. For culinary purposes, the flavor compounds (essential oils) are the primary concern, and these are well-preserved by low-temperature drying methods.
How do I know if my kitchen is too humid for air drying herbs? If your kitchen regularly feels damp, windows fog easily, or you notice condensation on surfaces, your humidity is likely above 60 percent — the threshold where mold risk increases significantly. A basic hygrometer (under $10 at most hardware stores) will give you an accurate reading.
Can I dry herbs in the microwave if I only have a small amount? Yes. Place 4 to 6 sprigs between two paper towels on a microwave-safe plate. Microwave on high for 1 minute, then check and continue in 30-second bursts. Total time is usually 1 to 3 minutes. Watch carefully — scorching happens quickly, especially with thyme and dill.
Is it safe to eat herbs that took longer than expected to dry? Yes, as long as there is no mold and the herbs pass the crumble test. Longer drying times simply mean the environment was more humid. The herbs are safe to eat once fully dry.
Can I rehydrate dried herbs if I use too many in a recipe? No, rehydrating dried herbs does not reverse the drying process or reduce their potency in a dish. If you’ve added too much, balance with additional liquid, fat, or a mild ingredient like potato or rice to absorb the excess flavor.
What is the best temperature for oven drying herbs? The ideal range is 170 to 200°F (77 to 93°C). Temperatures above 200°F begin to volatilize and destroy the essential oils that give herbs their flavor. If your oven’s lowest setting is 250°F, prop the door open slightly to keep the internal temperature lower.
Do I need to wash herbs before drying them? Washing is recommended if the herbs came from a garden with soil splash or pest exposure. If you’re using store-bought herbs that are already clean, a gentle shake to remove debris is sufficient. Always dry washed herbs completely before bundling.
How many herbs can I hang at once in a small kitchen? As many as you can hang without the bundles touching each other. Touching bundles restrict airflow between them. In a typical small kitchen, 4 to 8 bundles hanging from a tension rod is practical and manageable.
Can I dry herb flowers the same way as herb leaves? Yes, but flat screen drying is better for flowers like lavender buds and chamomile. Hanging can cause petals to fall. Spread flowers in a thin single layer on a mesh rack and allow 1 to 2 weeks for full drying.
Conclusion
Drying herbs in small spaces using traditional kitchen methods is genuinely accessible to anyone — no dehydrator, no outdoor garden, and no large kitchen required. The techniques covered here, from hanging bundles to oven drying, have been used for centuries precisely because they work with minimal equipment and minimal cost.
Your actionable next steps:
- Start with one woody herb (rosemary or thyme) and the hanging bundle method. It’s the most forgiving for beginners.
- Check your kitchen humidity. If it’s consistently above 60 percent, plan to use oven drying as your primary method.
- Gather your tools: kitchen twine, a hook or tension rod, a few small glass jars, and labels. Total investment is under $15.
- Harvest your first bundle, tie it slim (no thicker than your thumb), and hang it in a warm spot away from direct light.
- After one to two weeks, do the crumble test. Once it passes, jar your herbs immediately with a date label.
The satisfaction of reaching for a jar of rosemary you dried yourself — knowing exactly where it came from and how it was handled — is one of those small kitchen pleasures that genuinely improves daily cooking. Start with one herb, get comfortable with the process, and expand from there. The learning curve is short, the cost is low, and the results are worth it.
References
- Bown, D. (1995). Encyclopedia of Herbs and Their Uses. Dorling Kindersley. https://www.dk.com
- Grieve, M. (1931). A Modern Herbal. Harcourt, Brace & Company. https://www.botanical.com/botanical/mgmh/mgmh.html
- National Center for Home Food Preservation. (2021). Drying Herbs. University of Georgia. https://nchfp.uga.edu/how/dry/herbs.html
- Tucker, A. O., & DeBaggio, T. (2009). The Encyclopedia of Herbs: A Comprehensive Reference to Herbs of Flavor and Fragrance. Timber Press.
- USDA Agricultural Research Service. (2019). Postharvest Handling of Fresh Herbs. https://www.ars.usda.gov
Read next: Growing Mushrooms in Your Kitchen: A Beginner’s Guide Using Coffee Grounds. A closer look at growing mushrooms in coffee grounds.